Friday, December 14, 2012

HOW TO: Sandbag terrain

Hi Everyone!! Just a quick "TUT" of sorts for all of you aspiring guardsmen out there. I had to build up a piece of terrain for my local club and I decided to put a sandbag emplacement on it as the Original had a small crappy one on it. Anyway here is how I did it.

First off I got my base and planned directly on it. I got a piece of scrap plywood I had and put Foamcore on it with a hot glue gun. The foamcore is so I can actually hollow out an area for the emplacement. After that I drew out the area for the actual building to set so I can place it back later after I build up some areas. I then cut out the emplacement area and used filler to smooth out the edges.
After then I made a pattern of the hole I cut out to have a place to build up my sandbags. I do this as not to smash the foamcore while trying to texture and build the wall. Also the filler was still wet and it gave me a dry area to build on.


From there I decided to make a "jig" so my bags are all around the same size. I just cut a square out of cardboard about the size of a dime. 


From there I just roll out sculpy and make a snake. I cut off enough to be manageable and go to town.

From there I roll it out some more and then flatten it out to form a flat snake.
Then I lay my jig on the Snake and cut out the bags.....

I then take these squares and use my fingers to round them out some to soften the corners and make them more "bag-like".

After I round out a bunch of them and have a good supply I then start to build my wall. I build in a "true" fashion and interlock the bags. this adds stability to the bags wall and realism.  If your needing help with this Google Sanbag bunkers and the like and you should get some good pictures. Anyway interlocking them makes them look real and remember they are NOT PERFECT so dont be afraid to misalign them a tad bit. SOME people texture them either by pressing cloth into them OR putting cloth band aides on their fingers and pressing their fingers into them. Also a good idea is to take a sculpting blade or knife edge and score a "seam" into the edge of the bags. I did not do this in these because I was in a rush and forgot. Oh well its only a club peice and when I repair it I will do it next time!!! LOL

Here is the bunker wall I made and then baked to make it hard. I then glued it to the base and painted it. I will show pics of that in the next day or so.


And Thats it!! Thats how I built the sand bag wall!!

SO Whats been going on the past MONTH??

Ok well it HAS been almost a month since I have updated BUT this is my Busy time of the year with my Work and real life. Not to make excuses though I have made a LITTLE progress on some projects and will share those now.

Dark Hunter Marines
I have made very little progress on them. I have sprued the pads for casting and Will be casting them soon, HOPEFULLY later today. We will see.

Commission Painting
I have made a little progress here. I have assembled and primed them and decided I do not like the way they are attached to their "Tabs" so I am cutting them off the tabs and going to make special bases for them all. I am going to start with the Dwarf or the Assassin And go from there. Both were sawn from their tabs and mounted to a painting holder. I will have pics of these sometime soon.

Steampunk chest
This is where I have made the most progress here. I have torn down a old paper shredder we had for some Large gears and little "oddities" and I will cast these in Resin (they are metal!!) so I can shape them easier. I have bought a reproduction  license from Dragon Forge to use his Gears in the sculpt and have assembled quite the collection of Gears and bobs to make the sculpt. I also have purchased Bronze powder for it and have a good idea of what I am going to be doing. Now that  I have most everything at hand I will be sculpting the box as soon as I get some scrapbooking foil. I am using a method I learned from a friend who scrapbooked and its a texturing technique that looks Just fantastic. Here is a pic of how it will look


The sculpt itself will be mostly foamcore as a base and will be then cast in resin once sculpted. It SHOULD be a cool little chest for nick nacks and I am considering making 2-3 sizes and shapes. Maybe a pencil holder also... Dunno. We shall see here too....LOL

Terrain.
I have made a couple pieces of terrain for the club in this month. Nothing real fancy but I built a generic building and a building with a sandbag pit. I will post the sandbag pit one after this post as I made a little tut for it.

Comp Painting
I have really not done much here, but I am Gearing up for it. I found an old Ertl model of an ATST i had and think I might build and paint that as well as the Dust stuff and other ideas I had. Im running out of time for sure BUT Its for gencon so i do have some time. I just might not be doing everything I wanted and concentrate on a couple of projects.

Work and real life
THIS is where most of my time has gone. Im working alot as everyone wants to take off from work to Hunt and spend holidays with Family SO I have been doing alot of OT. ALOT!! Also as My Wifes family will be coming down to MD for the holidays We are cleaning and digging in storage to get all the Decorations out and all of the extra stuff IN. The Family sleeps in the spare room and that unfortunately is where my paints and such are set up SO But getting ready for Family I am having to bury my hobby stuff.

Anyway Thats whats been going on around here so Keep you Thought pure and Purge the Filthy Xenos!!
Munkey!!

Friday, November 16, 2012

Marine Update And Painting commission!!!

OK Well first things first Lets do a Dark Hunter Update:

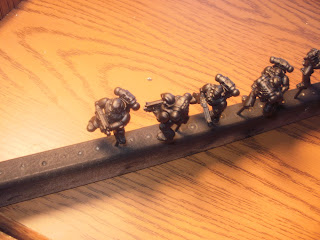
OK well I have all of the troops repaired and Primered now and have started painting with Blue Spray paint. I am doing the "Ron Saikowski Dark and Fast Method" that uses Spray paint to achieve a Very quick and good looking basic zenithal highlighting effect for a model. Im using Rustoleum Midnight Blue over Primer Black.  This is giving me a VERY DARK blue. Im gonna actually say TOO dark. So Im going to continue and lighten up the blues with the old trusty Airbrush and try to get some color varients in there so it doesnt look like blue spraypainted models on the table. Here is a couple of Pics of the WIP...


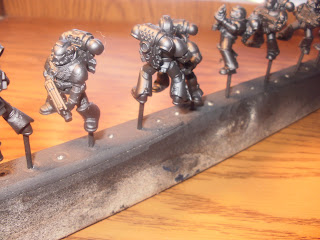
Now I realize the models are NOT very visible in the pics BUT Thats what I got for right now. NOw I posted a "early release" of this post on a forum of Hobbyists I am a member of Called The Terran Guard And some Guys PMed me about how I made my Jigs to hold the models and for more pictures of them in action... SO I DID take some and you can see some of the models closer there.


SO Thats about how I did them... Heres a breakdown
I drilled a hole into a foot of EVERY TROOP. I then cut toothpicks in half with nippers and glued them in the hole in the foot where the pointy part was down. This will serve as a attachment and holder for while Im painting and allow me to hold the mini without touching it. You can see the tooth picks on the minis in the pictures. From there I drilled holes into a scrap board I had to allow the toothpicks to go into to allow the minis to have a stand for holding them while drying and such. Thhis allows me to hold and paint the mionis and gives me a place to set them to allow the primer and paints to dry. Sometimes I find the toothpicks Kinda fiddly so I often push the toothpicks into some sort of "Cork" to serve as a Larger area to hold. I normally have Wine corks I use BUT on such a large project I dont have NEAR that many SO i went to my Local craft store to find some. Corks were expensive at Jo Ann fabrics So I went to the Foamy section and picked up some "foam Marshmallows" to serve as Corks. These were Called "Darice Foamies Shapes-Marshmallows" and cost about 2-3 bucks for 15. I found that using these they were not Heavy enough nor wide enough to support the mini Like real corks would so I had to build a "jig" to hold them. SO I went to Home depot, bought a 2x3 framing stud for a dollar (Literally $1!!!) and sawed it into 4-2 foot sections. I then took a 1 inch paddle bit and drilled one inch hole in the board to put the marshmallows. You can see Both of my Jigs in the  pictures. And TA_DA!!! I have a painting jig and holder for painting!!

I ALSO Got my Shoulder pads in the Mail from Ben AKA Fleafa at mastercrafted.co.uk And they look AMAZING!!! Here Look!!!


Well Crap.... Trust me then. They Look GREAT!!! I bought these and the rights to cast them up so Look for a mold making post and casting post sometime in the near future.

And Also I got another package in the mail..... Minis for a "commission" paintjob!!! Oliver AKA 01i From Table Warfare Sent out 5 minis for me to paint up for him and photograph and in return I get to KEEP THEM!!! They seem to be decent enough sculpts and I look forward to putting them together and painting them up. My goal on them is to have all 5 painted and based before Valentines day. That gives me 3 months to paint them to a HIGH standard and also continue working on my projects and Comp pieces for Gencon..... Oh wait did I say Painting Comp pieces for Gencon??? Yea I did....Oops, I guess the cats out of the bag now Huh???


OK Well that about does it for now, SO Recite your Devotionals, Dont Waste your Ration Bars, And Serve the Emperor Well...

Munkey!!


Tuesday, October 30, 2012

Stripping Revisited

Some of you might remember my article on Stripping And I mentioned Stripping liquids I use Simple Green and Acetone. Well there is another product I failed to mention Castrol Super Clean.

I have tried this before and was like "meh...." as it didn't really work very well.
Well I recently was talking with a friend and come to find out I was using it wrong. I got some tips from my buddy (who swears by it) and I stripped my Dark Hunters marines using the tips I got from him.... and we now swear by it too.... Its actually VERY GOOD!!! But Why?? HOW do I use It??? Well here is all you need to know about Super Clean as a stripper!!!

First things first Where do you get it??
I got mine from a local Auto supply, but you should be able to find it at any auto supply like Advanced or Pep boys, or even Walmart. Your looking for the Jug like I have above NOT the spray. It should be between $6-10, I paid $10 but my friend Lyn Stahl has it in TX for about $6.....Remember Jug NOT spray

What does it do?
Well it removed paint from Plastic metal and resin. I have noticed that simple green works good on plastic but sometimes doesnt do resin. Also SG will eat impurities in metal where this will not. Also if left long enough it will also break the bond of superglue because its a chemical process that we will get into soon.

How do I use it???
Well follow the basics in my stripping tut. As for the Liquid Use 50/50 Super Clean concentrate and regular tap water. Diluting it in water is actually necessary to be more effective though.  This has something to do with the hydroxide ions being dissolved and such but Chemistry class was so long ago. Anyway Ensure there is enough liquid to cover your models and I was using a 2.5 gallon bucket from Home Depot VS a 5 gallon. I was unaware of the ingredients and I did not use gloves for the first strip, as I rarely wear gloves when stripping with SG.... BAD IDEA!! You can see how I have stripped all the oils out of my left hand and have a Dry skin issue. It went away after 2-3 days and hand lotion.

The reason it dries out your hands is it contains Sodium Hydroxide and uses it as a degreaser so... ALWAYS WEAR GLOVES!!! Also good ventilation is always good. Its also safe to pour down the drain if you want as its not toxic.


Now How does this work exactly???
Whats going on is really a chemical reaction with the Hydroxide ions and the paint. I like to think of it as like soda. the more I agitate it the more bubbles release and such SO if I reuse the solution over and over eventually it will go flat. Adding more Solution brings back the soak to optimum levels again, but I have been using the solution till its "flat" then starting new. If you choose to reuse it and  just add more dont dilute it as the water from the first mix and the "used" cleaner is basically water too so just add more concentrate to your mix.It comes down to availability of the ions in the solution to bind with the paint, which is going to be a function of the paint you're stripping, the solvent content, and the water content, assuming it works the way I think it does.The trick is also to remove excess paint as you can, allowing new paint to be exposed to the solvent. It is  recommended to take a soft toothbrush to the models 30 to 60 minutes after they hit the dip, and then again another 30 to 60 minutes later. I dont always do this as I dont like to brush them but once but if you want the best strip you can. I just let them soak for a bit and then scrub them down. If its not clean I toss it back in and get it later. But Im lazy. Its ALSO good to point out that Chemical reactions are picky and lazy, and not smart. As you strip paint from the model, the large chunks of paint are often left in the solution. The solvent doesn't care if the paint is on the model or not so it's going to react no matter what. A large amount of your solvent is being used up in unnecessarily dissolving this paint that has sloughed off in the soak. Another reason it is recommended to take a brush to the model within the first hour or two a few times, removing those large amount of paint that are loose enough for you to remove, but otherwise will waste a bunch of your solvent's stripping power. Remember the soda.... this is like shaking your bottle before you pour it in a glass.

And from a Forensic Chemist This is whats going on....
SuperClean contains EDTA.  EDTA is an agent that will help with water hardness and acrylic paint is water soluble. The hardness is caused by for example calcium and magnesium ions (the cause of scale on kettles and in bathrooms, etc) and EDTA is a chelating agent - basically mopping up these ions, softening the water and therefore helping the solubility of the acrylic paint and making the sodium hydroxide in solution more effective. Sodium metasilicate also decreases water hardness. The Poly(oxy blah blah) is a surfactant - it lowers the tension between two liquids and you'll see various surfactants in every detergent known to man - basically helping break down the barrier between two liquids. When that barrier is lowered it aids in cleaning.

Well thats a mouthful but in Monkey terms its making it good. It works and thats what matters. Really. So my assessment?? Its what Im going to use to strip paint off plastics from now on. Its amazing how well it works and I am planning on getting rid of all my simple green and replacing it with super clean.
Well thats it for the Stripper Revisit so till next time Serve the Emperor well!!!

Munkey!!


Dark Hunters Army: update and Project log

Hello!!!

OK well first off Its the Day after the Storm, As some of you know Im on the East coast (Washington DC area) and we are dealing with Hurricane Sandy. Last night was the landfall and downgrade to Tropical Storm but We are all OK here and I personally had no flooding nor damage as far as I can tell. Here are some pics from a buddy and coworker of Mine Pete Giove-FourWinds who lives about a mile from me and is a professional part time Photographer. The link contains his portfolio which also contains Galleries that contain nudity. BE WARNED if you are sensitive.

Again we are fine and alls Well....

NOW on to the MEAT!!! Dark Hunter Marines!!!
I have finished stripping the Marines and have been busy repairing some of them I broke and those who are not what I want. I have not been to storage for more bitz but Im able to get most of what Im wanting, and will build more when I go to storage for the proper bitz. There is about 100 power armored marines, 30 Termies, 10 assault marines, 25 Bikes and 6 speeders. I have not started with the rhinos yet, but Im going to put up to 6 rhinos in the army. Here is some pics:


Today these will get placed on Painting sticks (toothpicks in the feet)  and HOPEFULLY basecoated/primered. I am using American Accents Midnight Blue as my base color/primer.

Its currently 40 degrees F and Rain so we will see about priming today. I might do it in the foyer to avoid the rain but its still cold... And once its primed I will start painting with the Airbrush and I cant do that outside without freezing, so Im needing a indoor spray booth. I'll look into that but it might just be a table by a window and a fan blowing out....LOL

As far as Pads Im getting some masters made from a buddy Ben AKA Fleafa and will cast them myself for this project. Im planning on putting the chapter badge on BOTH shoulders with a white shield for the chapter icon and colored shields on the other shoulder for squad markings. Also I plan to do the rims maybe a different color on the squad pads... foe easy ident on the table. Im not sure yet. Now I have YET to pay Ben for them so.... They will be later......

AS for Bases Im going to use Dragonforge "Parched Earth" Set in a Blue-Grey ash waste theme to tie in to the blues of the Armor but be much lighter in color. Maybe paint in the sand brown like the pics but give a blue glaze when done to shade and tie in....Anyway Here are the bases:


This should be about all I got going on for the Marines. If you got any questions or comments Feel free to hit me up!!

Until next time Serve the Emperor well!!!
Munkey!!


Wednesday, October 24, 2012

More on Munkeys NEW marines

OK well I have been talking with some friends and such and I found some pads I liked.....

.....Warning From here on out Fluff bunnies might get upset.....

I found these:

I was super happy and I thought they would fit my Dark Hunters marines well.... See??

Adds a little more texture and still have the "double headed axe" look!! WIN!!! Except I forgot to realize I did not read completely the Badab War books from Forge World.....

Well DAMN!! The Executioners stole my Iconography!!! The Bastards!!! So I looked more into the Executioners and found not only did I like their Icon but the also had a blue color scheme before Forge World changed my FLUFF!!! (this is another rant altogether though!!)
NOW this Kinda fits my Objective of working more with the airbrush as I can do the camo with an Airbrush, but I however do not like it. Really I dont like it. And I have seen Executioners before but have never seen Dark Hunters So what Im going to do is a little bit of Heresy. Im going to use the icons as Dark hunter Icons and paint them as Dark hunters. I will however look to the fluff in the FW books from the Executioners to pattern my vehicles and squad markings some. 

I also have found a VERY cool blog that did some very nice Executioners called Fourth Company Librarium and He (I think its a He!! pretty sure) and He used some Chapter house Doors for his Rhinos and did some pretty good ideas for markings.....


Im thinking I will Like this "new" direction and then I will have a good playable army and work on my airbrush tech for painting minis. I picked up some Tamiya acrylics and Airbrush hose for my new airbrushes (im going from an Iwata to Badgers I got on Ebay). Im going with Tamiya Flat blue with field blue and medium blue to act as my highlight and shade.
SO thats a little update and I hope no one is too mad im using some "liberty" with my icons....;)

So till next time Serve the Emperor well!!
Munkey!

OH!! PS I saw this on Darogs Company blog and thought we would like to get some of this....;)