Thursday, April 26, 2012

Display in 7 Days??

OR it could be named "how to polish a turd in 7 days"....

But anyway.....

My Wife as some of you know is a very active member of the Veteran Artist Program called  VAP for short. Well last night she told me that she was asked to set up an Art display at West Point Academy to showcase Veteran Artists. She asked me if I would provide a showcase model for her to display and of course I said OK.... Then she told me she's leaving on the 2nd of May.... ONE WEEK!!!

SO I dug about and found an old trash Chimera that I was planning to maybe make some terrain out of. This will be my "7 day showcase model"..... I had done a little work on the model before thiss was taken, but it was a HUGE glue bomb but fairly complete.

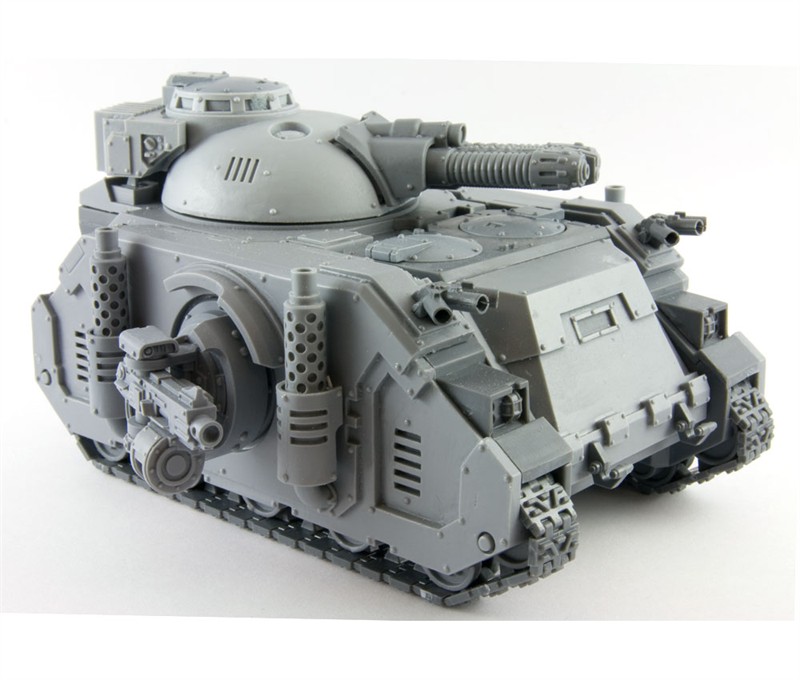
I want it to be something unique and not a part of my Armies so Im converting it up to resemble a M113. This is mainly because whoever assembled it was a glue monkey and put superglue EVERYWHERE on the model. So Im tearing it apart and sanding/filing all the places out and will have to go in and redo the rivits as Im taking all of them off...  Im going for kinda a stream lined look so the dumb gun ports will be covered also. Here is "inspiration" of sorts
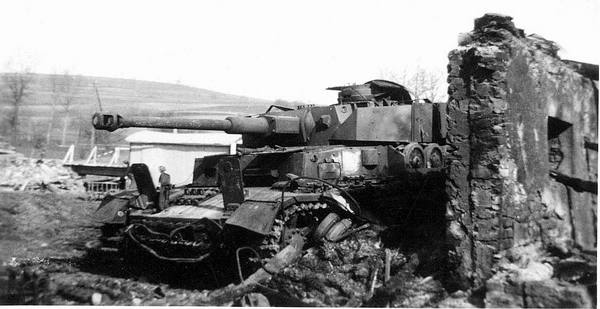
And the "look" Im wanting to go for

OK well I pulled the hull apart and wanted to go for the "2 hatch over under" look that the M113 had so I trimmed back some of the hull and made a driver hatch low and will put the "gunner hatch" high. Im putting a Heavy stubber on it because it looks like a .50 Cal and will have the gunner in a "Name tape Defilade" and the "driver" (actually more like the TC  but Hey...) will be in the lower hatch with Binos on the lookout. Im also Short on track so Im adding Track guards and "Cheater Links" to compensate for my Lack of track. Here is my Initial fit up....

and my "cheaters" that add the height of track but are not track.

NOW we all know that the differance in a great model and a mediocre one is the details.... So Im trying to spend most of my time doing them.... Little details that come together and make the whole better. Im doing Braided wire tow cables and lots of rivit work using microbeads. Im also going to weather it like crazy to bring out some depth to the paint but not take hours and hours to do.....  Here are some of the "detail" WIP pics
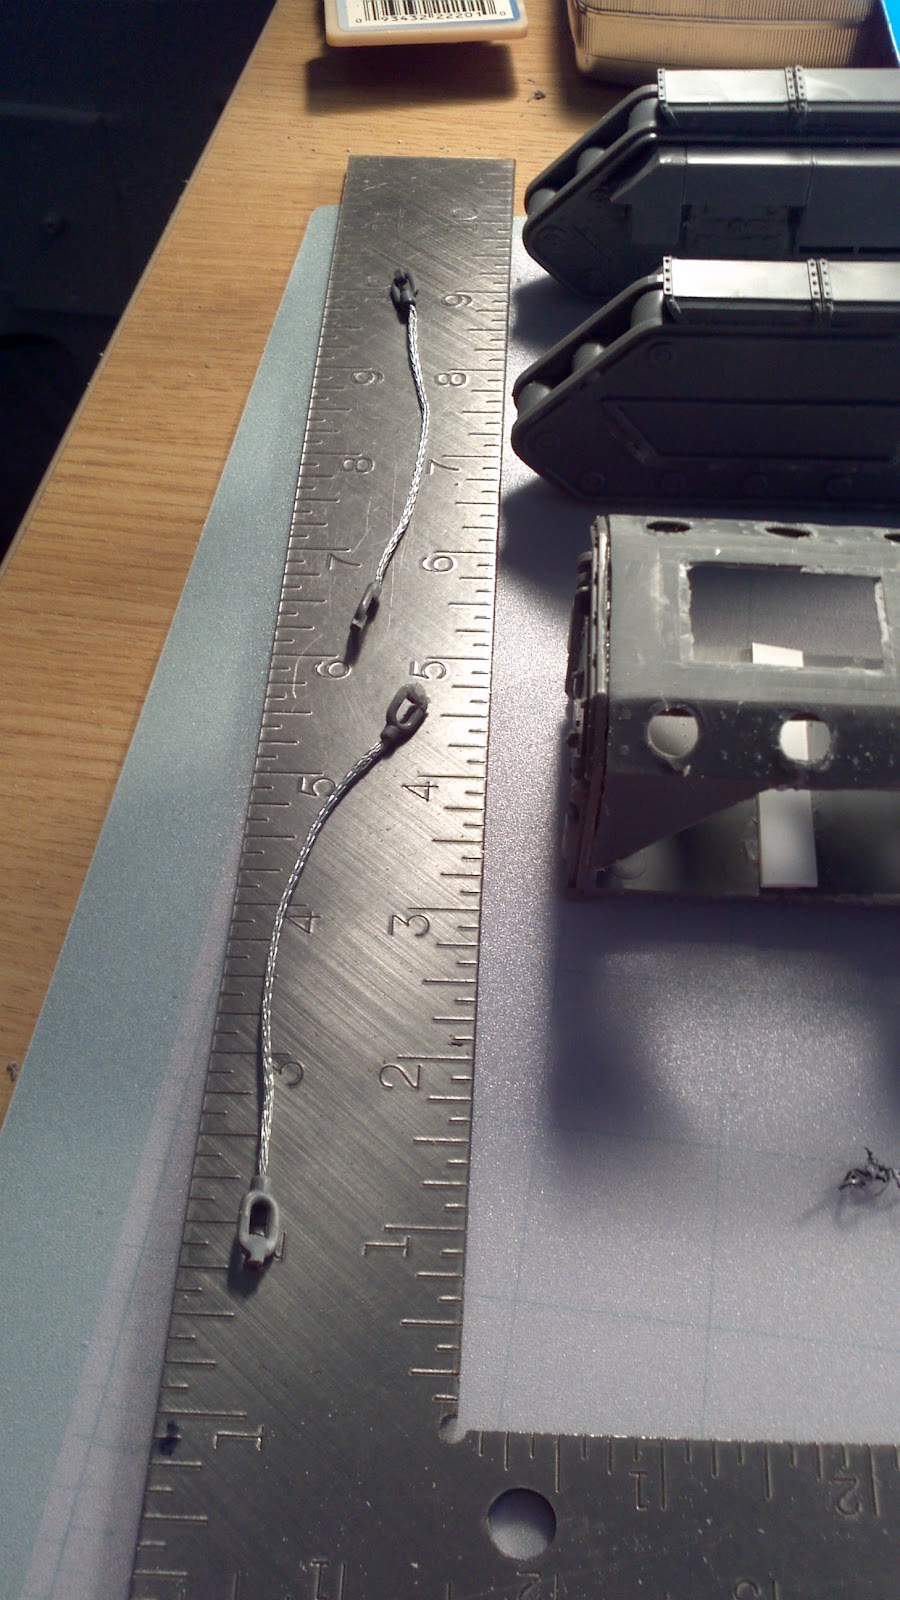
And a pic of Microbeads im using for rivets  to show scale....NOTE not my hand.....
I also plan to put a dozer blade on the front to help hide some fitting issues and extra glue that is being a pain to remove.....

And for those of you wanting to replicate these steps and techniques I will try to take pics and  describe how I did it, but if your really wanting to know, Just get this book..... as its mostly how im doing things

 Well thats all I have done in the 5 hours I have spent so far, But I plan to work on it later tonight before work and tomm morn when I get off. Its going to be close but Im hoping I am able to finish in time.... If not I guess I will have to submit the old standbys.... Some painted models from my Army....


Friday, April 20, 2012

DAMN you Forge World!!!!

OK well Im sure most of Us have seen the FW Newsletter BUT if not, Heres a quick Blurb Before I go to bed.


Deimos Pattern Predator Executioner

The robust and reliable Predator tank has long been favoured by the Space Marines and has seen service in a wide variety of patterns, some of which have come and gone in answer to wars and threats innumerable and long forgotten. In the conflicts of the 41st Millennium the Destructor and Annihilator patterns are the most widespread by far, although some Chapters such as the Blood Angels manufacture unique variants of their own.

One of the most prized patterns is the Deimos Pattern Predator Executioner, which mounts an Executioner pattern Plasma Destroyer. This ancient and powerful weapon fires a series of sun-hot plasma blasts capable of incinerating flesh and blasting apart even power armour with contemptuous ease. Only the forge world of Ryza is still able to manufacture the advanced photo-plasmic cells needed for the Executioner weapon. This has resulted in many chapters whose Techmarines have sufficient skill and knowledge replacing the Plasma Executioner with a Heavy Conversion Beamer instead.

This turns the Predator Executioner into an extremely powerful siege unit and long-range tank destroyer, but this firepower is gained at the cost of manoeuvrability and increased vulnerability to short-ranged attacks. That such a modification carries a long standing seal of remittance from the Adeptus Mechanicus speaks of cataclysmic battles in a forgotten age, in which such devastating firepower was more common, and more necessary.

More on that HERE

AND


Space Marine Apothecary Set

Among the many ranks and honours of the Adeptus Astartes, it is that of the Apothecary, perhaps, which holds the most respect for the import of his role.
Well versed in the arts of cybernetics, chirurgery and bioengineering required to transform a mortal aspirant into a post-human Angel of Death as well as battlefield aid, the Apothecary must also be a warrior of unquenchable bravery and might.

If a battle-brother falls, it is the Apothecary that will tend his wounds so that he may return unto the conflict. If his wounds are too great, it is the Apothecary that will grant him the Emperor’s Peace and it is the Apothecary that will ensure the Chapter’s due is taken from the battle-brother’s flesh; removing and guarding the sacred progenoid organs that will be implanted into a new aspirant.

More on that HERE.

Well Its Bedtime for me, and till next time Serve the Emperor Well.....

Munkey!!

Monday, April 16, 2012

HOW TO= Stripping: Tools and Equipment

OK well here we go continuing on our HOW TO series with Stripping Tools and Equipment. Stripping is an essential skill for the Budget Gamer. Buying on Ebay and Bartertown most used models will have paint on them, and 99% of the time its NOT your scheme or level of painting. By stripping the old paint off you bring back detail and allow a "less than happy" paint job transform into a Very nice piece of your Army. Here is how I do things, and know that this is not the only way to do it But ONLY the way I do.

Tools and Equipment
First off what do I need to strip paint?? Well Basics are Stripper liquid, Models to strip and something to hold them in. Heres what I use to put everything in....
Homer Bucket= Home Depot For $3-5. ENSURE YOU GET A LID!!


I Use 2 of these And have a "shallow" and a "deep" soak. I put troop models and the like in "shallow" while my "deep" I put tanks and titans in. This is not needed but I find it easier to pull troops out of a shallow bath VS deep and Shallow will not cover most large tanks. Just me though and not needed. I have seen some people put models in a mason jar and paint cans. I use paintcand bought at Home Depot for metals but only use Acetone in them, Simple green WILL EAT the impurities in the metal......And is why I use Acetone too But more on this later.

Now we need the stripping liquid.
 I use Simple green and Acetone. 

I buy 5 Gallons at a pop and spend $50 or so bucks for it and Buy Actone for about $15 a gallon. ONLY PUT Acetone in metal, and use safety precautions. Simple green is eco and user friendly so I use it for most of my things. Simple green DOES however eat impurities in metals and I use Acetone to clean Metals. Acetone also melts superglue and and plastic parts so I like to use it for metals.

And Something to remove my parts. 
a strainer
I use this to remove parts and also to set in my sink to catch small parts I drop. You can get these from ANY place like WalMart, Target, or Kmart. No need to spend lots of cash on this and its not a requirement.

Last you will need something to scrub with.
Denture Brush, Tooth Brush and Electric brush
 I use mostly the denture brush because it has a tooth brush AND a cone shaped detail brush. not only that but its got a large handle and is easy on the hands for long periods of stripping. I also give the standard toothbrush a workout also but some use electric toothbrushes. Whatever you want to use as a brush is fine.

This is all you need for the actual stripping. I also use certain tools to break up models and break them down before and after stripping. Heres a list of them.
Up first is something I use all the time.....
Screwdrivers

I use a precision set as well as regular screwdrivers. I use quality screwdrivers from Craftsman for a prybar because if I damage them I can return them no questions asked. I have yet to damage one, even though I have tried!!! For my precision screwdrivers I bought them on sale at some auto store bargain bin for like $5 I think. Now I use both common and Phillips, Here is a pic for those who dont know the difference...
I use the Phillips as a punch to push things that need it and the common or Flat as a pry and a wedge. its one of those things that you can experiment and develop your own way. NOW you dont NEED this one and its probably worthless for our purposes but its cool.....


I also always have cutters
Nippers and Sidecutters

OK well we SHOULD have these already BUT they are almost required to have. I use nippers for small stuff and side cutters for the big stuff.

And Lastly Another must have you should have in your toolbox....
Exacto blades
Self explanatory But you might find a use for these while doing the hobby....;) I use them to cut glue welds and models from bases and such.....

OK well this is what I use to strip models. I hope you find it useful and any questions leave a comment!!

Till next time Serve the Emperor well!!!

Friday, April 13, 2012

Monday, April 9, 2012

New Citadel Paints.... A Munkey eye view

OK well today I was able to sample the NEW RANGE of GW paints. There are SO MANY reviews and talk about them right now So I will try to give you my input in a simple format as Im a simple guy who likes to paint BUT I have never won a Golden Deamon.  Matter of Fact the closest I have come to one is working with Jen Haley and  Tom Schladel At Gencon and seeing Dave Taylor at My Semi local gaming store....We live about 30 mins apart....LOL!! Anyway I will Give a Humble opinion of the new range for all the OK painters out there for whom this set is targeted to.

CAVEAT: I have Mild  Anomalous trichromacy (Deuteranomaly) AKA red-green color deficiency. Sometimes it is hard to distinguish red-green shades and those DAMNABLE Ishihara color test plates are the bane of my existence. I do well on the Farnsworth Lantern Test Though and served Proudly in the military. Just Be aware that my color SHADES are affected but saturation and pigment are not.


OK well on to the review!!

The Basics
These seem to be pretty good paints as usual. The colors are different BUT GW has almost DOUBLED their line. They went from 72 paints to 142 paints. Very nice! I also like the fact they uphold good quality paint, As expected. The prices have stayed the same for the most part ($.30+ USD per mL The MOST EXPENSIVE of all paint) so this will make GW fans happy as its not another price hike!. They also went back to the old bottles that have a little tab to hold it open and seem to seal better. This is a plus and a minus for me, as I dont like the tabs BUT sealing your paint has always been a problem with GW.... OH and they used names from their own IP and for me some of the names are lost in translation. But thats just me...;)

Now In depth look.

  1. Base: These seem to be the replacement to the Foundation paint range. These are fairly different as they are smoother and strong colors But they are less like foundations and more like regular paint. Very strong pigmented paints!!!. They seem to cover pretty well and require 2+ coats for good coverage NOT the one coat wonder like GW claims. I do like they added Metallic bases and a White for Black Templar players. Its like the Old Days when you used Tin Bitz as a base for ALL your metals!! All in all they are a easy to use, good coverage paint. 
  2. Layer: These seem to replace the standard paints. Again almost double your range of colors so A+ there.They seem to be on par with most other top lines out there in color strength and consistency. Not much changes here, but i was happy with the old paints and VERY HAPPY about the addition of more colors.
  3. Shade: These replace the washes. These are good and Not much has changed. I like how they are easy to use and help lesser painters like me help cover up our mistakes. Again not much changed.
  4. Glaze: These seem to be a Thin wash possibly for blending and smoothing transitions. I think these are more for advanced painters who are looking to transition their colors and look for graduating colors. Anyone who is was thinking of Glazes Should be able to smooth their colors with these but they do seem more for the advanced painter VS the basic hobby painter.
  5. Dry: These are new and made to help drybrushers. There is nothing else like them on the market currently so I have NO comparison with any other product. I did not use these much BUT I saw them used and they seem to be Very good for those who drybrush. These are basicly like very paint and you dip your brush in and drybrush. No real wiping paint needed! They are pigment with little acrylic flow medium. What I noticed from users was a drybrush effect with little "chalky drybrushery" signs.
  6. Texture: These are also new and would help out with bases or mud effects. These are THICK paints with fine sand or something in them and you need a thick strong brush to apply. Old drybrush or tank brush would be Ok. Again I did not use these BUT They were being used on Bases and on Tanks. On bases I think they looked OK but it seemed to take alot and you had to use 2 coats. It worked well as mud effects on tanks though and if I were to use them I would use them for that.
  7. Technicals: these are Acrylic mediums, Gloss Varnish, Liquid green stuff and brush on Primer. I did not use these and did not see them being used.  I imagine they are on par with the old versions.
Overall Opinion??
Im Happy about the expansion of the range, but the Dry compounds and texture seem like a gimmic. The Paints are good but 2-3X the price of Vallejo Reaper or Privateer press P3 and these are of the same quality. Also the pots are Better BUT I am still of the belief that GW wants your paints to dry out and for you to buy more. Washes and glazes are good but again for the price I will continue to make my own using Les Bursleys formula and other recipes I find on the net. I like the range, I may pick up some of the colors, But Overall I will stick with My Vallejo and P3 paints. GW makes a great product but Way overpriced.....

Sunday, April 8, 2012

SO New paints Huh?? what you puttin them in??

Well with the NEW Citadel Paints (My review will be Monday afternoon), We come to the point now where we have HUGE amounts of stuff on our desks.... What to do?? Well ORGANIZE!!!

Aaron Cains  From Back2base-ix.com Has developed a cool stand for your tools and paints. Back2Base-IX is an Australian company and ships all over the world. Heres is the Newsletter Blurb on it.
It's all about work bench storage area at the moment. Whether you spend a little or a lot of time at your hobby desk, its always a good idea to keep things within easy reach, in a place you know it will always be when you need it, No matter if its paint, your trust hobby knife, your green stuff and sculpting tools, or even your rinse cup and hobby scenics.
So we've kicked things into overdrive here at B2B and have started producing a storage rack system that is not only a great way to keep organised, but then gives you your work space back, eliminating any clutter.
But that's only the beginning. The entire system has been designed so that it is modular, rare earth magnets holding one unit to the next. So if it's paints you want to store, or all your favorite tools, they can sit alongside each other right alongside your work space.
And yet there is still more choice... Colour. That's right, choose your colours. Custom pick your colours from our extensive range of acrylics to create a storage system that reflects your own personal style. Whether its minimalist black and clear, to bold green and yellow, the choice is yours, your own storage system to suit you.
But wait, you prefer MDF (Medium Density Fiber Board)? Not a problem. The entire range will also be available in this durable and less expensive material.
So we hope this new range of products gets you inspired to build and paint your models just like its helped inspire us to start creating the next piece to add to the range. Stay tuned...

I have been a long time customer and they always have good quality products.  You can also check out their FACEBOOK PAGE and get up to date with the current products.

And heres some pics


Sunday, April 1, 2012

Forgeworld Open Day!

OK well Im  American, so all of this is a regurgitation of some of our UK bretheren BUT Its just Amazing stuff and needs to be shared.

First up we have the Imperial Enforcer. This is an AMAZING model and I really want one!!!
and a Video from MarneusAugustaCalgar on youtube HERE....

Next we have the Tartaros Pattern Terminators.... Very cool and I want to get some also!
And a Video from Chuffy1976 on Youtube HERE....

And the Stormeagle..... not sure about this one BUT its kinda cool. 
And another video unbagging from MarneusAugustaCalgar HERE.....
And now some pictures I collected from various sources mostly from Alec's blog Apocalypse40k and miniature wargame conversions.


For those old enough to remember the Spartan...... I am VERY happy to see this again and Glad I dont have to cut up my Rhino to glue on a Land Raider....;)

Well till next time, Server the Emperor well....
Munkey