OK Guys Here are some more vids for you!!! First off the One part mold Video:
http://www.youtube.com/watch?v=AesASRoRecY
and Reconditioning Super Sculpey clay
http://www.youtube.com/watch?v=2lKaEhzva1Q
Again I have NO IDEA WTF Blogger is not locating my videos so I had to post links again.
Showing posts with label casting. Show all posts
Showing posts with label casting. Show all posts
Saturday, May 18, 2013

Sunday, May 12, 2013
Quick notes: Im not dead!!!
Just a quick post to say im not dead and I am on track.... Heres a video or two I made telling you all about whats going on and what is coming up!!

I dont know why Blogger is not locating my youtube uploads BUT Here we go anyway...
Catching up: what I have been doing!
http://www.youtube.com/watch?v=yBCxOb885ts
Quick vid on Measuring Volumes for mold making:
http://www.youtube.com/watch?v=MlzrtN07vaM
And Tomm morn we should have our One part mold video complete!!
Anyway Thanks again for stopping in and Serve the Emperor well!!!
Munkey!!

I dont know why Blogger is not locating my youtube uploads BUT Here we go anyway...
Catching up: what I have been doing!
http://www.youtube.com/watch?v=yBCxOb885ts
Quick vid on Measuring Volumes for mold making:
http://www.youtube.com/watch?v=MlzrtN07vaM
And Tomm morn we should have our One part mold video complete!!
Anyway Thanks again for stopping in and Serve the Emperor well!!!
Munkey!!
Thursday, January 31, 2013
Missing post....
Well It appears that the post I made on the 15th was not posted. I hate that, as I am almost positive It was something on my end and Im quite sure it was my failure to hit post before closing out the window. SO I will repost it here to the best of my memory and then do the post I had planned for today in a couple of days.
OK here we go.... The post that was SUPPOSED to be Jan 15th.... Lucky me I made a outline on paper!!!
You Tube!! Munkey Joe Goes LIVE.... Sorta!!!
Munkey Joe Paints and Castings Now has a you tube Channel and I will be doing videos and tutorials On several different subjects such as painting, Casting, Terrain, army building, Various Money saving hints, and basicly many aspects of the Hobby. My Main effort is to have a channel that can entertain and educate you in the hobby even if your a seasoned Vet, or if you Just bought you FIRST box of minis. There will be something for everyone on my channel.
My main strong points are casting and casting tutorials, and tips and tricks. So the MAIN focus will be Hobby resin and casting. Im a decent enough painter and an OK model builder So I will toss some of that in there too no worries.
Im starting out small and am working now with a Buddy who is good with Photoshop and some video editing to help make my title screens and intro parts. As of right now Im recording with my cell phone and am looking for some sort of video editing software to make movies with (EDIT I found Voices of Mars VIDEO helpful with this, Im going to buy Vegas I think). Once I get set up things will be going better and I hope to have better quality stuff for you.
My itinerary for videos will be mostly my Casting class outline filmed as a seminar. I will cover basic casting and advanced casting and will mostly be dealing with Silicone and urethane resin. Here is the "plan" but notice that things happen and this is subject to a bit of change, as well as Video Length may modify some of the videos. I hate Long boring videos, so I wont make them if I dont have to.
Series one: Basic casting
-Overview and materials
---Familiarizing with terms and tech
---Material Suppliers
---Identifying needs to determine your plan
-Simple Molds
---Push molds
---Poured silicone one part molds
---Poured silicone Simple two part molds
-Getting started
---Identify your plan
---Gathering materials
---making a moldbox
---prepping for pour
-Pouring molds
---Using silicone= HOW TO mixing and pouring
---Prepping your part
---First pour
---demolding your part.
-Pouring resin
---Using Resin= HOW TO mixing and pouring
---Prepping your molds
---First pour
--- Demolding your cast
Series Two: Advanced Casting
-Intro
-Advanced two part molds
-One part block molds and split molds
-Casting with pressure
-casting with vacuum and pressure
And for those who are wanting to find us on YouTube: Munkey Joe YouTube Channel
OK here we go.... The post that was SUPPOSED to be Jan 15th.... Lucky me I made a outline on paper!!!
You Tube!! Munkey Joe Goes LIVE.... Sorta!!!
Munkey Joe Paints and Castings Now has a you tube Channel and I will be doing videos and tutorials On several different subjects such as painting, Casting, Terrain, army building, Various Money saving hints, and basicly many aspects of the Hobby. My Main effort is to have a channel that can entertain and educate you in the hobby even if your a seasoned Vet, or if you Just bought you FIRST box of minis. There will be something for everyone on my channel.
My main strong points are casting and casting tutorials, and tips and tricks. So the MAIN focus will be Hobby resin and casting. Im a decent enough painter and an OK model builder So I will toss some of that in there too no worries.
Im starting out small and am working now with a Buddy who is good with Photoshop and some video editing to help make my title screens and intro parts. As of right now Im recording with my cell phone and am looking for some sort of video editing software to make movies with (EDIT I found Voices of Mars VIDEO helpful with this, Im going to buy Vegas I think). Once I get set up things will be going better and I hope to have better quality stuff for you.
My itinerary for videos will be mostly my Casting class outline filmed as a seminar. I will cover basic casting and advanced casting and will mostly be dealing with Silicone and urethane resin. Here is the "plan" but notice that things happen and this is subject to a bit of change, as well as Video Length may modify some of the videos. I hate Long boring videos, so I wont make them if I dont have to.
Series one: Basic casting
-Overview and materials
---Familiarizing with terms and tech
---Material Suppliers
---Identifying needs to determine your plan
-Simple Molds
---Push molds
---Poured silicone one part molds
---Poured silicone Simple two part molds
-Getting started
---Identify your plan
---Gathering materials
---making a moldbox
---prepping for pour
-Pouring molds
---Using silicone= HOW TO mixing and pouring
---Prepping your part
---First pour
---demolding your part.
-Pouring resin
---Using Resin= HOW TO mixing and pouring
---Prepping your molds
---First pour
--- Demolding your cast
Series Two: Advanced Casting
-Intro
-Advanced two part molds
-One part block molds and split molds
-Casting with pressure
-casting with vacuum and pressure
And for those who are wanting to find us on YouTube: Munkey Joe YouTube Channel
Friday, December 14, 2012
SO Whats been going on the past MONTH??
Ok well it HAS been almost a month since I have updated BUT this is my Busy time of the year with my Work and real life. Not to make excuses though I have made a LITTLE progress on some projects and will share those now.
Dark Hunter Marines
I have made very little progress on them. I have sprued the pads for casting and Will be casting them soon, HOPEFULLY later today. We will see.
Commission Painting
I have made a little progress here. I have assembled and primed them and decided I do not like the way they are attached to their "Tabs" so I am cutting them off the tabs and going to make special bases for them all. I am going to start with the Dwarf or the Assassin And go from there. Both were sawn from their tabs and mounted to a painting holder. I will have pics of these sometime soon.
Steampunk chest
This is where I have made the most progress here. I have torn down a old paper shredder we had for some Large gears and little "oddities" and I will cast these in Resin (they are metal!!) so I can shape them easier. I have bought a reproduction license from Dragon Forge to use his Gears in the sculpt and have assembled quite the collection of Gears and bobs to make the sculpt. I also have purchased Bronze powder for it and have a good idea of what I am going to be doing. Now that I have most everything at hand I will be sculpting the box as soon as I get some scrapbooking foil. I am using a method I learned from a friend who scrapbooked and its a texturing technique that looks Just fantastic. Here is a pic of how it will look

The sculpt itself will be mostly foamcore as a base and will be then cast in resin once sculpted. It SHOULD be a cool little chest for nick nacks and I am considering making 2-3 sizes and shapes. Maybe a pencil holder also... Dunno. We shall see here too....LOL
Terrain.
I have made a couple pieces of terrain for the club in this month. Nothing real fancy but I built a generic building and a building with a sandbag pit. I will post the sandbag pit one after this post as I made a little tut for it.
Comp Painting
I have really not done much here, but I am Gearing up for it. I found an old Ertl model of an ATST i had and think I might build and paint that as well as the Dust stuff and other ideas I had. Im running out of time for sure BUT Its for gencon so i do have some time. I just might not be doing everything I wanted and concentrate on a couple of projects.
Work and real life
THIS is where most of my time has gone. Im working alot as everyone wants to take off from work to Hunt and spend holidays with Family SO I have been doing alot of OT. ALOT!! Also as My Wifes family will be coming down to MD for the holidays We are cleaning and digging in storage to get all the Decorations out and all of the extra stuff IN. The Family sleeps in the spare room and that unfortunately is where my paints and such are set up SO But getting ready for Family I am having to bury my hobby stuff.
Anyway Thats whats been going on around here so Keep you Thought pure and Purge the Filthy Xenos!!
Munkey!!
Dark Hunter Marines
I have made very little progress on them. I have sprued the pads for casting and Will be casting them soon, HOPEFULLY later today. We will see.
Commission Painting
I have made a little progress here. I have assembled and primed them and decided I do not like the way they are attached to their "Tabs" so I am cutting them off the tabs and going to make special bases for them all. I am going to start with the Dwarf or the Assassin And go from there. Both were sawn from their tabs and mounted to a painting holder. I will have pics of these sometime soon.
Steampunk chest
This is where I have made the most progress here. I have torn down a old paper shredder we had for some Large gears and little "oddities" and I will cast these in Resin (they are metal!!) so I can shape them easier. I have bought a reproduction license from Dragon Forge to use his Gears in the sculpt and have assembled quite the collection of Gears and bobs to make the sculpt. I also have purchased Bronze powder for it and have a good idea of what I am going to be doing. Now that I have most everything at hand I will be sculpting the box as soon as I get some scrapbooking foil. I am using a method I learned from a friend who scrapbooked and its a texturing technique that looks Just fantastic. Here is a pic of how it will look

The sculpt itself will be mostly foamcore as a base and will be then cast in resin once sculpted. It SHOULD be a cool little chest for nick nacks and I am considering making 2-3 sizes and shapes. Maybe a pencil holder also... Dunno. We shall see here too....LOL
Terrain.
I have made a couple pieces of terrain for the club in this month. Nothing real fancy but I built a generic building and a building with a sandbag pit. I will post the sandbag pit one after this post as I made a little tut for it.
Comp Painting
I have really not done much here, but I am Gearing up for it. I found an old Ertl model of an ATST i had and think I might build and paint that as well as the Dust stuff and other ideas I had. Im running out of time for sure BUT Its for gencon so i do have some time. I just might not be doing everything I wanted and concentrate on a couple of projects.
Work and real life
THIS is where most of my time has gone. Im working alot as everyone wants to take off from work to Hunt and spend holidays with Family SO I have been doing alot of OT. ALOT!! Also as My Wifes family will be coming down to MD for the holidays We are cleaning and digging in storage to get all the Decorations out and all of the extra stuff IN. The Family sleeps in the spare room and that unfortunately is where my paints and such are set up SO But getting ready for Family I am having to bury my hobby stuff.
Anyway Thats whats been going on around here so Keep you Thought pure and Purge the Filthy Xenos!!
Munkey!!
Friday, November 16, 2012
Marine Update And Painting commission!!!
OK Well first things first Lets do a Dark Hunter Update:


 Now I realize the models are NOT very visible in the pics BUT Thats what I got for right now. NOw I posted a "early release" of this post on a forum of Hobbyists I am a member of Called The Terran Guard And some Guys PMed me about how I made my Jigs to hold the models and for more pictures of them in action... SO I DID take some and you can see some of the models closer there.


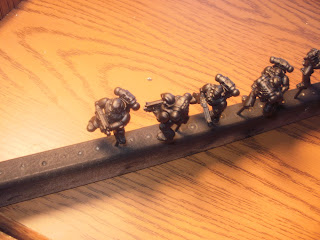

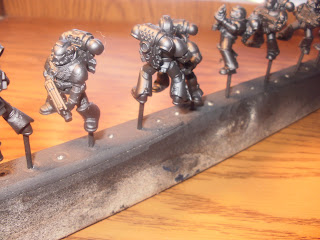


 SO Thats about how I did them... Heres a breakdown
I drilled a hole into a foot of EVERY TROOP. I then cut toothpicks in half with nippers and glued them in the hole in the foot where the pointy part was down. This will serve as a attachment and holder for while Im painting and allow me to hold the mini without touching it. You can see the tooth picks on the minis in the pictures. From there I drilled holes into a scrap board I had to allow the toothpicks to go into to allow the minis to have a stand for holding them while drying and such. Thhis allows me to hold and paint the mionis and gives me a place to set them to allow the primer and paints to dry. Sometimes I find the toothpicks Kinda fiddly so I often push the toothpicks into some sort of "Cork" to serve as a Larger area to hold. I normally have Wine corks I use BUT on such a large project I dont have NEAR that many SO i went to my Local craft store to find some. Corks were expensive at Jo Ann fabrics So I went to the Foamy section and picked up some "foam Marshmallows" to serve as Corks. These were Called "Darice Foamies Shapes-Marshmallows" and cost about 2-3 bucks for 15. I found that using these they were not Heavy enough nor wide enough to support the mini Like real corks would so I had to build a "jig" to hold them. SO I went to Home depot, bought a 2x3 framing stud for a dollar (Literally $1!!!) and sawed it into 4-2 foot sections. I then took a 1 inch paddle bit and drilled one inch hole in the board to put the marshmallows. You can see Both of my Jigs in the pictures. And TA_DA!!! I have a painting jig and holder for painting!!
I ALSO Got my Shoulder pads in the Mail from Ben AKA Fleafa at mastercrafted.co.uk And they look AMAZING!!! Here Look!!!


Well Crap.... Trust me then. They Look GREAT!!! I bought these and the rights to cast them up so Look for a mold making post and casting post sometime in the near future.
And Also I got another package in the mail..... Minis for a "commission" paintjob!!! Oliver AKA 01i From Table Warfare Sent out 5 minis for me to paint up for him and photograph and in return I get to KEEP THEM!!! They seem to be decent enough sculpts and I look forward to putting them together and painting them up. My goal on them is to have all 5 painted and based before Valentines day. That gives me 3 months to paint them to a HIGH standard and also continue working on my projects and Comp pieces for Gencon..... Oh wait did I say Painting Comp pieces for Gencon??? Yea I did....Oops, I guess the cats out of the bag now Huh???

OK Well that about does it for now, SO Recite your Devotionals, Dont Waste your Ration Bars, And Serve the Emperor Well...
Munkey!!
OK well I have all of the troops repaired and Primered now and have started painting with Blue Spray paint. I am doing the "Ron Saikowski Dark and Fast Method" that uses Spray paint to achieve a Very quick and good looking basic zenithal highlighting effect for a model. Im using Rustoleum Midnight Blue over Primer Black. This is giving me a VERY DARK blue. Im gonna actually say TOO dark. So Im going to continue and lighten up the blues with the old trusty Airbrush and try to get some color varients in there so it doesnt look like blue spraypainted models on the table. Here is a couple of Pics of the WIP...


I drilled a hole into a foot of EVERY TROOP. I then cut toothpicks in half with nippers and glued them in the hole in the foot where the pointy part was down. This will serve as a attachment and holder for while Im painting and allow me to hold the mini without touching it. You can see the tooth picks on the minis in the pictures. From there I drilled holes into a scrap board I had to allow the toothpicks to go into to allow the minis to have a stand for holding them while drying and such. Thhis allows me to hold and paint the mionis and gives me a place to set them to allow the primer and paints to dry. Sometimes I find the toothpicks Kinda fiddly so I often push the toothpicks into some sort of "Cork" to serve as a Larger area to hold. I normally have Wine corks I use BUT on such a large project I dont have NEAR that many SO i went to my Local craft store to find some. Corks were expensive at Jo Ann fabrics So I went to the Foamy section and picked up some "foam Marshmallows" to serve as Corks. These were Called "Darice Foamies Shapes-Marshmallows" and cost about 2-3 bucks for 15. I found that using these they were not Heavy enough nor wide enough to support the mini Like real corks would so I had to build a "jig" to hold them. SO I went to Home depot, bought a 2x3 framing stud for a dollar (Literally $1!!!) and sawed it into 4-2 foot sections. I then took a 1 inch paddle bit and drilled one inch hole in the board to put the marshmallows. You can see Both of my Jigs in the pictures. And TA_DA!!! I have a painting jig and holder for painting!!
I ALSO Got my Shoulder pads in the Mail from Ben AKA Fleafa at mastercrafted.co.uk And they look AMAZING!!! Here Look!!!


Well Crap.... Trust me then. They Look GREAT!!! I bought these and the rights to cast them up so Look for a mold making post and casting post sometime in the near future.
And Also I got another package in the mail..... Minis for a "commission" paintjob!!! Oliver AKA 01i From Table Warfare Sent out 5 minis for me to paint up for him and photograph and in return I get to KEEP THEM!!! They seem to be decent enough sculpts and I look forward to putting them together and painting them up. My goal on them is to have all 5 painted and based before Valentines day. That gives me 3 months to paint them to a HIGH standard and also continue working on my projects and Comp pieces for Gencon..... Oh wait did I say Painting Comp pieces for Gencon??? Yea I did....Oops, I guess the cats out of the bag now Huh???

OK Well that about does it for now, SO Recite your Devotionals, Dont Waste your Ration Bars, And Serve the Emperor Well...
Munkey!!
Monday, October 22, 2012
Munkeys New marine army
OK Well some of you know Im making and working on a couple of armies. I have my beloved Red Scorpions That are ALL FORGEWORLD MK4 armors that I'm building up as well as painting and rebasing my Catachans. The Red Scorpions are of course going to take some time as Im wanting to paint them well and make them look good as its $40 for 5 marines.... So I want my moneys worth and will take some time to do. As for the Catachans Im doing swamp base themes for the entire force of about 400 models. Im using the Secret Weapon Blasted Wetland bases so Im using water effects and taking some time to do. NOW BOTH of these armies are playable showcase armies (not only a TT standard but a little better) and I also am wanting to paint more models with my Airbrush so I dont want to mess them up. Ok well here is a recap of the Red Scorpions and Catachans. and why its going to take a while...
Red Scorpions:
Im doing the Angstrom Incident Camo Scheme and using Dragon Forge Designs "Urban Rubble" bases.

 Im using the Forge World MK4 armors and will be painted to a pretty good standard. I would say its what I would paint as a company Champion level, Not a centerpiece but better than a high tabletop. This is an Infantry heavy army with very few vehicles.
Catachans
The Catachans are all on Wetland bases from Secret Weapon and are painted in the Standard "GW" Green with Red bandanas.

 Im using Standard GW Catachan IG plastics I put together and Sprayed them OD camo Green. These will be primarily painted with an airbrush and detailed with a brush. they will receive an "oil color wash" for their main shading and to add a :grimy" and "dirty" vibe. The big deal with them is the sheer number and the Water bases.
Now this brings me to where I am using Airbrushes for my minis.... How am I going to get practice and not mess up my good minis?? How do I solve this dilemma??? I paint the Space marine army I have in my closet!!! LMAO!! Yep I have an Old "Garbage Army" of marines that are just a collection of several different colors and builds that I have picked up on Ebay and such from time to time. there are "White Scars" painted like Garbage, "Black Templars" that have been painted pretty craptastic, a smattering of test colors and a handful of Just plain plastic.. These will get a dark blue spraypaint job and will be done mostly with an airbrush. Im choosing the "Dark Hunters" Chapter as the scheme because its Easy to paint, and its Dark and will easily cover any colors not removed in the Stripping. I am looking to a buddy to do some custom Shoulderpads for me and I will cast them up to make the paint go faster (its raised details and will not be freehand!!) Here is what they will look like:
 Im thinking I will use Either the "Desecrated Lands" range from Dragonforge that are sculpted by the talented Mathieu Fontaine OR the "Lost Empires" range also from Dragonforge. Im leaning toward the "Desecrated Lands" though....;) Im using the following List of Models to make an actual list.
6 Speeders
20 Bikes
4 attack bikes
1 Chaplain on bike
10 assault marines
20 terminators
95 power armored marines
6 rhino
Again they need some stripping and such that I will start on tomm but tis is what Im going to be working on so I can play some games this edition....LOL
And as for my projects I have been working on I have been doing some progress. Im working on the bases that I have been doing and making more masters also. I hope to get another bottle of Silicone sometime soon so I can make more molds for bases and hope to have these as a viable product sometime soon. I also got my Truescale Terminator models from Three Stage Studios. It took some time to get but Talking with the guy I think him and I can possibly come together in the future and make some magic. He seems to be a pretty good guy all in all. Also on the Commissar bust..... UGH.....I almost dont wanna talk about it so I will just do a photo dump and ask for your prayers..... LMAO!!


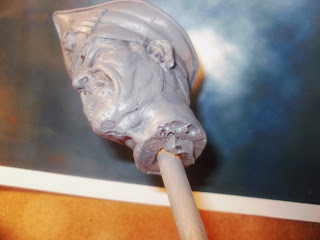


 OH yea... I almost forgot!! I also found some Tau in my Storage.... Maybe these will get some paint sometime or maybe they will hit Ebay... Dunno yet.


 Well that about wraps up this weeks projects and fun SO till next time Serve the Emperor Well!!!
Munkey!!
Red Scorpions:
Im doing the Angstrom Incident Camo Scheme and using Dragon Forge Designs "Urban Rubble" bases.

Catachans
The Catachans are all on Wetland bases from Secret Weapon and are painted in the Standard "GW" Green with Red bandanas.


Now this brings me to where I am using Airbrushes for my minis.... How am I going to get practice and not mess up my good minis?? How do I solve this dilemma??? I paint the Space marine army I have in my closet!!! LMAO!! Yep I have an Old "Garbage Army" of marines that are just a collection of several different colors and builds that I have picked up on Ebay and such from time to time. there are "White Scars" painted like Garbage, "Black Templars" that have been painted pretty craptastic, a smattering of test colors and a handful of Just plain plastic.. These will get a dark blue spraypaint job and will be done mostly with an airbrush. Im choosing the "Dark Hunters" Chapter as the scheme because its Easy to paint, and its Dark and will easily cover any colors not removed in the Stripping. I am looking to a buddy to do some custom Shoulderpads for me and I will cast them up to make the paint go faster (its raised details and will not be freehand!!) Here is what they will look like:

6 Speeders
20 Bikes
4 attack bikes
1 Chaplain on bike
10 assault marines
20 terminators
95 power armored marines
6 rhino
Again they need some stripping and such that I will start on tomm but tis is what Im going to be working on so I can play some games this edition....LOL
And as for my projects I have been working on I have been doing some progress. Im working on the bases that I have been doing and making more masters also. I hope to get another bottle of Silicone sometime soon so I can make more molds for bases and hope to have these as a viable product sometime soon. I also got my Truescale Terminator models from Three Stage Studios. It took some time to get but Talking with the guy I think him and I can possibly come together in the future and make some magic. He seems to be a pretty good guy all in all. Also on the Commissar bust..... UGH.....I almost dont wanna talk about it so I will just do a photo dump and ask for your prayers..... LMAO!!


Munkey!!
Friday, October 12, 2012
BUSY Month... Lots to UPDATE!!!
Hey Everyone, This has been one Heck of a month.... I had some personal stuff come up and that is working itself out a bit, But I also have been real busy doing stuff. yea STUFF!!! I am currently rearranging my house to accommodate a dedicated workspace for myself to actually do work in with no moving about and having things moved on me. While that is going on Im still doing the off commission or so finishing up some painting things for the Local club and doing my personal projects. More on that later though.
One of the things that is taking a bit of time is actually Very good!! Im back in touch with my Old Modeling pals The Terran Guard. We were the Mods and Admins of a LONG abandoned Forum Called 40Kterra. While its always nice to link up with old buddies, we are actually looking to possibly get a Hobby forum started up again and show off some projects. The terran Guard had some real talent as far as modelers and collectors as well as some great painters. I hope this actually gets back into the swing and we make it a go as I would not only love to see my buddies doing stuff again BUT would like the input and push from pale to get my stuff together. We shall see though. But we can Hope huh?? lol
NOW lets talk about what I have been up to. First off was the promise of bases. I have 2 sets complete, the PP Lava/Icewater and the PP trenchboards. While I set them up for casting I pulled out my Silicone for making molds and discovered that it was "not ideal" to say the least....


As you can see the "liquid" is no longer liquid and has gelled.... I allowed it to Freeze and did not take care of it properly (I left it in my storage for winter!!) and I lost about $300 in Silicone. DAMN..... Well a Quick call to John Greer and more was on the way with a special note to me saying NOT to freeze it, and the shelf life is only good for 60 days..... I aint even Mad.... Had it coming. LMAO!! gotta love a company with a sense of humor.
Anyway Here is the update on how things are going for the other bases:
Lava style: PP complete WH sculpts started
Trenchboard style: PP complete WH sculpts started
Cracking mud/parched earth style: ordered sculpting medium to begin. awaiting delivery
Puddle/hazard puddles style: Sculpts started on Both sets
Cobblestone style: groundwork laid out and sculpts to begin Likely with the Parched earth.
Well as I touched on earlier casting was delayed. I currently have the 2 sets mounted up for pour and will pour very soon. I need about 3-5 hours to tend to the casting as Im using vacuum and pressure to make the molds and must keep them pressurized for the entire time the molds cure. So Im just waiting on time, as my silicone shipment arrived a few days ago. Molds of the bases as well as a personal project or two of mine are the first things to be cast up and more pics when I got something to report. Here is a couple of snap shots of the bases and some of the MKI molds:


I have been also pretty busy with terrain project or two with the Local Club. Im currently revamping some of the City terrain they have to make it more playable and nicer, and built a bridge set for the Rivers another member built last year. Im kinda happy with it as its bases off of Civil war Earthworks and can be used for several different games from fantasy to even futuristic on an ag world... Heres some pics:


I have not worked on the WW2 terrain yet as I am still in development with those... Sorry guys!!
Also last time I mentioned Busts. Well I'll give a sneak peek at whats going on here. I Bought a "Totally NOT Commissar Gaunt" bust on Ebay and when it arrived I was Less than happy. The resin was Rubbish and I actually was a little POed about it so I contacted the seller, who ACTUALLY was the sculptor. He was Very Helpful and sympathetic to my situation.... And I commissioned another bust by him. He IS very talented but Casting is NOT his strong suit as we both agreed..... Here is what I was supposed to get:


And HERE is what I actually got.....


SO what we have here is a LOW QUALITY Polyester resin cast of a model that SHOULD have been cast with rigid casting urethane. Not really a big deal I guess but its not the right type of tool for the job. Matt was a sport about it though and I am in the process now of filling and preparing the original cast I have for a mold to make a true Urethane cast from so I can paint it up. I have my work cut out for me....


As you can see I have drilled a hole for a dowel to be placed into the parts so I have a handle for working. You ALSO notice HUGE GAPING air holes and miscast parts.... I like to call this the Finecast effect.... LOL. I will place the dowels in the holes and give it a fine spray of Grey Primer to help me see the spots that need work as the translucent resin is hard to determine detail. Anyway... I have a lot of work and have only started o it So stay tuned and we will make headway on it soon. Oh did I mention another Bust commission???

SHHH dont tell nobody... this ones a one off and something special....The original is mine!!! :) If anyone is interested in contacting the Artist Let me know. Hes a great guy from the UK and TRULY an artist..... Just leave the casting to me though....LMAO!!
Well thats about a wrap up of the Happenings of the past few weeks, Im putting up alot of ebay auctions and such but I wont bore you with those right now. If your wanting to check some out hit me up on Ebay (my Ebay) and take a look around. I'll have alot of Warmachine and 40K up over the next few weeks....
Till then, Keep your thoughts Pure and Serve the Emperor Well.......
Munkey!!
Subscribe to:
Posts (Atom)